
If you, like so many of us, during quarantine bought chicks or started a vegetable garden, in a few months you’ll be in full harvest and egg collection mode. If that’s the case, you will need baskets to haul your fresh goodies in.
Save money and avoid the health risk of going to a thrift shop, and use material at hand to make a quick basket or two. There are lots of ways to make baskets, and if you still have some extra time to fill it’s quite a rabbit hole you can fall down.
But it is a project which can also be as low-key as you want it to be, especially if you are happy to make and use a rustic basket.
To make a rustic basket you’ll need:
-Clippers
-Pliable vines or branches
Grapevines, willow branches, wisteria and other supple branches are ideal, but experiment with what you have available to see what works. You can also buy willow branches, reed or other natural materials specifically processed for this craft.
Traditionally and professionally materials for basket making are dried first, then soaked in water. This allows the branches or reeds to dry to their final size, then absorb water simply to become pliable again.
If you try to weave with dry materials, they will crack and break as you go, resulting in either no basket or a very weak basket.
To use dried materials, soak the full length in water. A rule of thumb is an hour per continuous foot of material; i.e. if your branches are four feet long, soak them for four hours.
While not as popular or standard a technique, weaving baskets with green (fresh, not dried) materials can yield fun and funky baskets. The argument against this method centers on materials shrinking as they dry.
Unless you want a very tightly woven basket, and if you don’t mind the possibility of low durability, there isn’t any reason not to try making your next harvesting container with green vines or branches. Such a basket can also be simply decorative.
Whether using green or dried and soaked materials, this is one way to make a rustic basket:
If making a handle, secure the material in a circle, winding the material to create the handle thickness you want.
Use a rubber band or tied string to keep handle in an oval, at the desired angle of the basket sides.
Lay five or more pieces for spokes, in a cross. Half should lay in one direction, the other half across — the handle sides count as a spoke on either side, so consider them when choosing how many spoke branches you want.
Begin weaving by securing the center; take a very flexile branch, vine or reed, and wrap it around the groups of spokes — over the top group on one side, under the bottom group on the other, over the top on the opposite side, and under again for the last group.
Wind the piece multiple times in this fashion, tucking in the end to secure it. Take another flexible piece, and work the four groups of spokes again, going over the group you previously went under, etc.

Begin weaving. Using medium thickness branches or vines, entwine them over and under the spokes. Because you’ll have an even number of spokes, be conscious to switch which spokes you go over and under when you start a new weaving piece. If you are using a very long piece, which circles your basket more than twice, simply go over or under two spokes in a row to change which spokes are under or over.
For another look, and tighter weave, weave two branches or vines at once. In between each spoke twist the vines to switch, so they are always alternating which goes over and under the spokes.
Once the bottom of the basket is your desired size, bend the spokes up, securing them with clamps if necessary.
Weave tightly around, to keep spokes in an upright position.
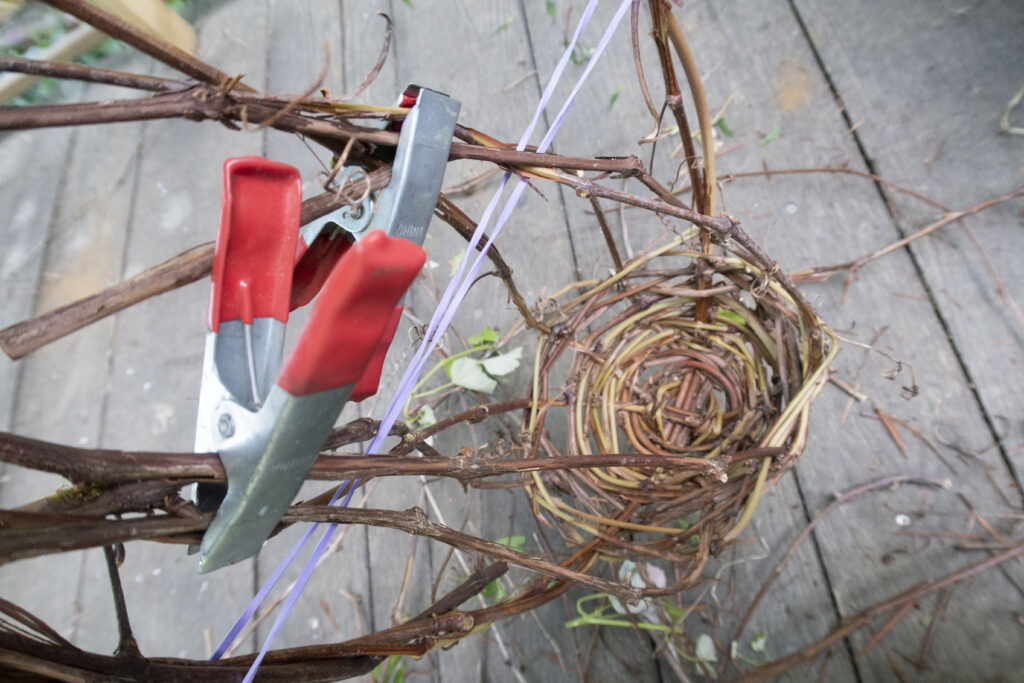
Continue weaving.
Once the sides are as tall as you’d like, stop weaving, leaving at least several inches of spokes unwoven at the top. Bend the spokes down, and weave them back into the basket, going over and under in various places to secure. Cut off any excess.
If your basket rolls instead of sitting upright, turn it over and weave some extra vines onto the outside of the bottom, to create a more even base.
Use and enjoy your basket!
There are many techniques and patterns for basket making. These instructions are a good place to start, but not to stop. Once you are comfortable with the process, try making different shapes and sizes, and enjoy the uniqueness and whimsy of rustic baskets, or delve into more conventional (but still creative) styles of the craft.
Then fill your handmade baskets with your harvest, with gifts (bonus points if they’re filled with veggies you grew or eggs from your chickens, or other handmade items), or use your woven creation as an organizer for household items.
By Aldona Bird
Tweet @DominionPostWV
